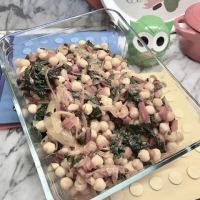
Swiss Chard is a delicious earthy vegetable, more complex in flavor than spinach and pretty when it’s red. You can also find them green with white stems, or what’s called Rainbow when gathered with white, red and yellow stems. All good. I use a very simple prep and saute or steam-saute it with onion (sometimes I add garlic or sometimes I swap out the onion for a shallot.)
Around this time of year, with the Jewish New Year, followed closely by the festival of Succot (the Festival of Booths, commemorating the temporary dwellings the Israelites built as they crossed the desert on their way to Canaan), I try to think of ways to prepare dishes with a little special touch. I asked one of my favorite Rabbis, Rabbi Avraham, at the Academy where I study, who happens to be a terrific cook, specializing in the dishes of the once-thriving Jewish community of Aleppo, sometimes referred to as “the Pearl” of Middle-Eastern Jewish cuisine for an example of a simply prepared and delicious vegetable dish to serve over the holidays. “That’s easy! One thing I really love doing is Swiss chard with garbanzo beans.” I stared at him. “That’s exactly what I was thinking about doing!” I asked him what seasonings he adds… turmeric, cumin, coriander? “Exactly,” he replied, “with a little bit of acid like lemon juice.” Perfect.
If you’ve never tried preparing Swiss chard, grab some at the next farmer’s market, or in the organic section produce of your favorite market.
Swiss Chard with Garbanzo Beans – Aleppo-style
Ingredients:

1 T extra-virgin olive oil
1 medium onion, thinly sliced, half-circles
2 cloves garlic, chopped
1 t. ground turmeric
1/2 t. ground cumin
1/4 t. ground coriander
1 large bunch Swiss chard (I like using multi-colored or red stalks)
Salt and pepper to taste
2 pinches sugar
Juice of 1/2 large lemon
1 15 oz. can garbanzo beans, thoroughly drained and rinsed
Directions:
Rinse Swiss chard leaves, shaking off excess water over the sink. It’s not necessary to completely dry them as the water beads create the steaming part of the cooking process. Trim the bottom of the center stalks. Then cut upward on either side of the stalk and around the top to separate the leafy part. Thinly slice the celery-like stalks and set aside. Pile a few leaves at a time and roll them lengthwise like a cigar. Slice up the cigar-like leaves making ribbon-like slices. This is similar to a popular way to cut basil, and is known as a Chiffonade. Set leaves and stalks aside separately.
Grab a favorite large saute pan with a lid (or use a piece of foil as a cover.) Heat pan. Add oil. Add thinly-sliced onion. Saute over medium heat. Add turmeric, cumin, coriander, salt, pepper and sugar. Saute for about 3-5 minutes. Add sliced center stalks of swiss chard. Continue sauteeing another 3-5 minutes, until stalks begin to get tender. Add the leaves, stirring in a small batch at a time. Add lemon juice, cover and cook until just tender, 3-5 minutes. This process moves quickly, so don’t leave the kitchen! Remove lid and stir in drained garbanzo beans. Heat through and adjust seasoning to taste.
bb Note: Try swapping out lemon juice for 2 T balsamic or red wine vinegar.
Serve with brown rice for a light meal, or as a side dish. Makes 4-6 servings.

“Acquire for yourself a teacher”… it’s a bonus if he can cook.
-Ethics of the Fathers , with a bb note
aka MOCK GEFILTE FISH

This beloved dish is from my Mom, Gerta Weintraub (from northern Romania), who received the tradition from her mother, who received the tradition from generations before her.
No, there’s no fish anywhere in sight and I am not making fun of anything, certainly not gefilte fish. The polkelech (drumsticks) in the recipe were a recent addition by unanimous vote, because my Mom and I adore them. Excellent for lunch after Rosh Hashanah, and as a forshpeis (appetizer).

My Mom is 97 now, and it’s probably more than 15 years since she made falsher fish, and probably the same amount of time for me. When I brought her some for lunch to share, her eyes lit up, and she said, with delight, “Kalichlech!” (chicken balls). My heart melted. I had not heard that Yiddish word in a long time.
I recently contributed this recipe to a small compilation of New Year Recipes of my synagogue, Temple Beth Am. My friend Norm Green sent me this juicy morsel of history:
“You might be interested to know the origin of the dish. Some Chasidim, especially Satmar (a sect of Jews who are from the border areas of Hungary and Romania, as was your mother’s family) do not eat fish on Passover, because they fear the fish might have eaten some bread and not fully digested it, so that there might be some chametz (leavened bread) inside. So they prepared chicken in the way that they would have made gefilte fish to eat it as a substitute. I’m surprised that your family had it for Rosh Hashonah, but why not? If it’s good, it’s good.”
Yes Norm, it truly is GOOD (with all those onions, how can it not be?) And if you are preparing it for Passover, swap out the amount of breadcrumbs for an equal amount of matzo meal, and omit the baking powder (adding a bit more salt).
And a bb Note: The key to a super-flavorful jellied broth (sultz), is to push the cooked onions through a sieve, mashing firmly with the back of a regular large spoon and then skimming all that delicious oniony-richness into the broth. As you can see in the photo, I used a slotted spoon. Mistake! Very ineffective. Stick with a regular big stainless steel spoon.

Falsher Fish has made a comeback! May this season bring you joy…
Falsher Fish
Ingredients:
6 chicken drumsticks
6 chicken wings
4 chicken necks
1 ¾ large onions, cut in 4 (the remaining ¼ onion is used for the chicken balls)
1 stalk celery, cut in half at the equator
3 medium carrots, cut in thirds
10 cups water
½ large bunch Italian parsley, tied with kitchen twine
12-18 whole peppercorns
½ – 1 teaspoon salt, to taste
For the chicken balls:
1 lb. ground chicken
¼ large onion, chopped fine
¼ cup soft Challah bread crumbs
1 egg
½ teaspoon baking powder
2 T. chicken broth
A little salt and pepper to taste
Directions:

Place cleaned and rinsed chicken pieces in soup pot, cover with onions, celery, carrots and peppercorns. Place parsley bundle on top. Add enough cold water to cover – should be 9-10 cups.
Bring to boil, then reduce heat to a gentle simmer and cook, without a lid, for 45 minutes. If the pot seems too crowded for the kalichlach, remove the chicken wings.
Meanwhile, make the chicken ball mixture. Using a mini-food processor or chopper, pulse a small section of challah until you have fine bread crumbs. You will only need ¼ cup. Save the rest for another use.
In a large glass bowl, mix ground chicken with chopped onion, egg, bread crumbs, baking powder and salt and pepper. Add 2 tablespoons of the chicken stock.
Set up a small bowl of cold water. Working quickly, dip your fingers in water and roll small balls of chicken mixture, about an inch and a half in diameter (Don’t worry, this is not an exact science. You’re making Kalichlech, for goodness sake! Think small matzoh balls.) You should have about 20, give or take.
Return stock to a simmer and cook for another half-hour. Remove chicken pieces, chicken balls and carrots (you can slice carrots before placing in fridge) and place in casserole or bowl.
Remove celery, parsley and peppercorns, if you can find them. With the back of a large spoon, mash onions, a little at a time, through the sieve and scrape the bottom so the good oniony stuff falls into the stock. Use a little bit of the stock to pour over the chicken to keep moist.
Store the stock in glass bowl, cover with plastic wrap and place in fridge to gel. Once gelled, it does not take kindly to being transferred to a smaller bowl. Keep it in the same bowl until eaten.Serve cold, as you would gefilte fish, with a spoonful of the jelled stock (sultz). Be sure to scoop up the sultz with the Challah. Geshmak! aka YUM! Serves 6-8.
PS If you have gelled stock left over, it’s like super-concentrated, delicious chicken broth. Add a little water and enjoy it heated with noodles, rice, or as is!


Welcome back to BB, my dear readers! It has been too long since we last met and the whole while I have been saying to myself that Bumbleberry Breeze is in hibernation… I love food, that’s pretty clear. Reading about it, talking about it, thinking about it, shopping for it, preparing it and of course, eating it. But maybe what tops the list is creating delicious food and sharing it with others. I love to offer nourishment and four years ago, my little voice was calling loudly that I needed to delve into another area of nourishment. Click here to read more. Scroll down to the September 2020 entry.
Another thing, too. Over a year ago I was having tummy issues. I was getting more bloated and feeling uncomfortable. I consulted with a G.I. doctor, but I didn’t really want to go the route of medications. Around that time, an acquaintance was talking about a wonderful documentary that she had seen, called The Game Changers. It looks at what happens when athletes switch to a plant-based diet. This of course, is nothing new. Some of my old buddies at Food Bloggers L.A. have been cooking this way for years (Shout out to Nancy Eisman [Tuna Salad made with garbanzo beans!] and Cathy Arkle [Cashew Cheese!] to name only two). The benefits are amazing: improved performance, improved stamina, quicker recovery time from injury. Who doesn’t want that? Near the end of the film the narrator challenges the viewer to try a plant-based eating plan for a few days. My husband and I watched it together, and I was delighted when he was so blown away by the documentary that Mr. Meat-loving Novio actually agreed! See for yourself… Check it out on Netflix.
It’s made a significant difference in the way we eat around here. But no, I am not exclusively plant-based. After our experiment, I noticed immediately that my tummy bloating had diminished. It was as if I had had a generalized inflammation in that area and by shifting what I put in my mouth, the door was open to finally reducing that inflammation. Then, I began re-introducing other foods. I noticed I did not miss chicken as much as I thought I would and the same with eggs and fish and dairy. But it was clear that overall I was doing better sticking to predominately plant-based food. These days, breakfast, lunch and dinner are mostly plant-based, with chicken a few times a month and the same with fish, eggs and a little dairy. I do still love ice cream and gelato, though I am occasionally pleasantly surprised by a dairy free version.
BB will be reflecting these shifts and I hope you’ll enjoy the upcoming dishes as much as we are.
There are tons of resources online to research and this is not an exhaustive list by any means but here are a few sites and books that I recommend:
The website Running On Real Food is terrific. The creator, Deryn Macy, is a runner and an extremely healthy eater and she doesn’t have time for multi-step recipes or spending inordinate amount of time in the kitchen. I love that her recipes are so helpful, straightforward and simple to prepare. Not to mention delicious!
Isa Does It by Isa Chandra Moscowitz
The Oh She Glows Cookbook by Angela Liddon
The Vegan 8 by Brandi Doming
Chloe’s Kitchen by Chloe Coscarelli… whose Pasta Italiano inspired the creation of this post’s recipe

Chloe’s recipe calls for cannellini beans added to the pasta and more cannellini beans to make the sauce. There are way way more beans in my pantry these days but I had just run out of cannellini beans! I am never the type to hurry to the market for a single item (especially in these crazy times), and I decided to use what I had on hand to create something else. So roll up your sleeves and get ready to NOT spend lots of time or effort in the kitchen, and pick up that fork of yours and enjoy!

Bb Notes: the original version of this recipe calls for a pound of short pasta. I tend to like more veggies and a little less pasta and I have fallen in love with a particular brand of brown rice pasta that is a little more pricey but so delicious that it is well worth it. It’s called Jovial, and the box of fusilli is 12 ounces in weight rather than a typical 16 ounces.

So if you’re using regular pasta or another brand of brown rice pasta, simply cook the whole box and use ¾ lb. for the recipe and throw a quarter of the pasta into soup or salad or a scramble…
Experiment with different brands of pasta. I adore pasta but my tummy tends to feel bloated when I have too much regular pasta… there are so many alternates out there that it is worth checking out to find a brand that you like. Expand yourself… Try brown rice, and there’s also lentil pasta, quinoa and all kinds of combinations. Whole wheat pasta is too dense for my taste and I think corn-based pasta is just too gummy.
Asparagus not in season or you don’t feel like it? Swap it out for the same amount of broccoli florets. Try swapping out the peas and adding a 15-oz. can of garbanzo beans after the pasta and veggies are drained and rinsed.
Ingredients:
¾ lb. fusilli
1 bunch asparagus, ends trimmed and cut into thirds
1 c. frozen peas
½ c. walnuts, roughly chopped
1 c. of almond milk, unsweetened (or your favorite dairy-free milk)
¼ cup extra-virgin olive oil
2 cloves garlic, cut into four
2 T. lemon juice, about half a lemon
1 t. dried thyme, or an Italian blend (salt-free)
½-3/4 t. sea salt, or to taste
Freshly ground black pepper to taste
Pinch or 2 crushed red pepper, optional
1 c. cherry tomatoes, halved lengthwise
Directions:
In a large pot, cook the fusilli in boiling salted water for 8 minutes. Turn heat down to low and add asparagus. Stir, return to a moderate boil and cook for an additional 4-5 minutes, until both are tender. Just before the pasta and veggies are ready, throw in a cup of frozen peas. Drain and return to pot.
Meanwhile, prepare the sauce by combining the walnuts, almond milk, olive oil, cut-up garlic, lemon juice, salt and pepper, and crushed red pepper in a food processor, or as I did, in two batches in a mini processor. Process until smooth.
Toss the warm pasta and veggies in a large bowl with the sauce and add the halved cherry tomatoes. Taste and adjust seasoning.

This girl can’t help it. Another nod to the Great Buckeye State. Plus, I really love peanut butter and chocolate. So I thought, why not in a granola bar? And I started thinking about it and before I got too far into it, I went to visit one of the uber-bloggers out there – David Lebovitz. Our buddy in Paris did not disappoint. He rarely does.
Meanwhile, my niece, her hubby and 2 little guys were preparing to move (the 2 little guys didn’t exactly join in in the preparing part, they’re little). They said their good byes to the Great Buckeye State of Ohio. En route to their next stop of Central California, they stopped off in LA to spend a bit of time with the family and gather their energy for the next step.
I wanted to send the drivers off with a little wholesome snack as they took their road trip up to their new home with little guys in tow. See pics below. We are in the same time zone again!
On to the bars…
Begin with the best quality peanut butter you can find. I love the freshly made pure peanut butter at Whole Foods. It’s the only natural peanut butter I know of that’s non-oily and doesn’t separate. I know, I can’t figure that out either – it’s one of the mysteries of life. I also love pressing the button and watching it swirl into the cup. It brings back soft-serve ice cream memories. Black & White Cones… ahhhhh. (for the uninitiated, that’s chocolate & vanilla).
[Yes, Lulu, you can use Skippy.]
Get out some chips.

Also necessary: oatmeal. Season it up a bit with ginger and cinnamon.


 I’m also using sweet butter. But you can easily do a non-dairy version with an Earth Balance stick or something with no trans-fatty acids.
 We’ve got a nice thick batter here.


Peanut Butter Chocolate Chip Granola Bars
slightly adapted from David Lebovitz’s version
Ingredients:
2 1/4 c. oats
3/4 t. cinnamon
1/2 t. ginger
3/4 t. baking soda
1/4 t. salt
1/2 c. chocolate chips
1/4 c. unsweetened coconut
1/3 c. dried fruit (raisins or diced dried apricots, cherries or cranberries)
4 T. unsalted butter, room temperature
1/2 c. brown sugar (dark or golden)
2 eggs
3/4 c. peanut butter
1/2 t. vanilla
Directions:
Preheat oven to 350°.
Place parchment paper in an 8″ square pan (or grease thr pan).
Mix the oats, baking soda, salt, ginger and cinnamon together in a bowl.
Beat butter and sugar together until light and fluffy in stand mixer (important when doubling recipe) or by hand for with a wooden spoon. Add eggs, one at a time, and fully incorporate.
Add in peanut butter and vanilla and mix well.
Add the oat mixture to combine.
Mix in chocolate chips, dried fruit and coconut and blend in well.
Place dough in prepared pan and using a spatula, spread evenly in pan.
Place on center rack. Bake for 20-24 minutes (22 minutes was enough for me), or until top is golden brown and is just set.
Cool completely before cutting. Stores well in refrigerator or freezer.
Makes 16-20 bars.
NOTE: Recipe can easily be doubled. Use a 9 x 13-inch baking pan and use 4 c. oatmeal, 3 eggs and 3/4 c. chocolate chips.. Double all other ingredients.


 off to our next chapter!
 the Smiler
A healthy candy? Hmmm…. maybe a healthi-ER candy. And what’s the connection between this girl from the Bronx transplanted to Los Angeles and Columbus? Sit back, and I’ll tell you.
Buckeyes are the proud team of Ohio State University where my beloved niece and her hubby completed their residencies. Beloved Niece has been a bit occupied these days. She’s a pediatrician and is Mama to two dear boys, the Elder- who is 2+ years-old, and the Younger who is 2+ months old. Her Hubby just completed his residency and was offered a fellowship in California. It’s in the middle of the state, but, Hurray, they’re heading back this way!!
Novio and I went to Columbus several weeks ago to visit the family. The children are beautiful, delightful and delicious. While we were there, it was the peak of spring. Flowers blooming, the trees vibrant and plush with leaves, people walking everywhere with their babies and dogs. Okay, the pollen was wafting by in the breeze, big as dandelion clusters. But, I was sitting outside with Beloved Niece and 3 guys, where most of us were eating Pancake Balls (addictive) and several other items, and I began to feel nostalgic.
Ohio has been good to Beloved Niece. She became a pediatrician there. The family lived in a sweet house in a sweet neighborhood there. And she brought 2 beautiful little boys into this world there. Not to mention the best ice cream ever was a mile away (Go Graeter’s!).
So, to honor Ohio and to offer my thanks, I present to you a natural version of Buckeye Candies. The candy is made to resemble the nut from a buckeye tree. It’s brown on the bottom and sandy-colored on top. To achieve that, we basically do a version of a peanut butter cup. What can be bad? And it’s very simple and fun to do. I’m giving you a recipe for about 30 pieces that can easily be doubled or quadrupled.
I start by using 100% natural freshly-made peanut butter from Whole Foods. It’s got great flavor and consistency and, unlike most natural peanut butters, the oil doesn’t separate. Most of the recipes out there use processed peanut butter (smooth).  We also use sweet unsalted butter, powdered sugar, vanilla and good quality chocolate. I used semi-sweet, but you can also try it with bittersweet chocolate.
 The recipes I looked at all used more butter and a LOT more powdered sugar. The goal is to add just enough powdered sugar to take the mixture from crumbly to a cohesive mass. Some of the recipes I saw used up to 6 cups of sugar for 1 cup of peanut butter! Ouch! Just not worth it to make very firm little balls. A softer product works really well. And I like them cold anyway. I’ve eaten a few frozen and melt them in my mouth, which is great fun too.
 Pull off small amounts and form into little balls, about an inch in diameter. Stick a little toothpick into each one. Place in freezer for about half hour to an hour to set (nothing will happen if you forget for a while)
 Now it’s time to melt the chocolate, either using a double boiler or 1/2 a minute at a time for about 1-1 1/2 minutes at medium power in the microwave. Use a shallow bowl to make the dipping process easy and stir well to be sure chocolate is thoroughly melted.

Leave a bit of the peanut butter showing for the buckeye effect!

Dippity-doo- dah Dippity Day!

BUCKEYE CANDY
Ingredients:
6 oz. natural peanut butter (use a type where oil doesn’t separate, if available)
3 T. unsalted butter, softened
1/2 t. vanilla
pinch of sea salt
1 1/2 c. powdered sugar (or just enough for it to come together as a firm ball)
4 oz. semi-sweet chocolate (bittersweet chocolate also works)
Directions:
Place waxed paper or parchment paper on baking sheet.
Beat peanut butter, butter, vanilla and salt with a wooden spoon (you can also use a mixer, especially if you’re making a larger amount).
Add the confectioner’s sugar, 1/2 cup at a time. The mixture will go from crumbly to coming together into a ball.With a tablespoon or your fingers, pull off a small amount and roll into balls, about 1-inch in diameter.
Place them on the prepared baking sheet. Gently place a toothpick into the top center of each ball. Freeze until firm, about 30 minutes.
Break the chocolate or chop into small pieces. Place in a shallow microwave-safe bowl (glass works well). Microwave in 1/2 minute increments, at medium power. Stir in between until chocolate is completely melted, about 1 1/2 minutes.
Remove peanut butter balls from freezer. Dip each ball into the melted chocolate, leaving some peanut butter visible on top. Let excess chocolate drip off and return candy to baking sheet.
Chill buckeye candies in the refrigerator until firm, about 1/2 hour. Remove toothpicks (if you like, smooth out the hole with a small offset spatula, or with your finger).
Makes about 30 candies. Store in container or Ziploc bag. Will keep in the refrigerator for a week and in the freezer for a month.
bb note: Do a variation on these candies and make Peanut Butter Balls. Simply dip chilled peanut butter balls completely in chocolate and chill. Leave as is or roll balls in chopped nuts or finely shredded coconut.
********
Beloved Niece and Hubby are now packing up the house. Thank goodness both Grandmas have signed up for active duty!
Meanwhile, the Younger smiles…

while the Elder takes inventory.


Eat in Joy!
What? More Passover recipes? The Seders are done, you say? But wait! There are several days to go. And for that, I offer you Passover Granola. Delicious for breakfast with yogurt and fresh fruit. Or with milk, as a healthy alternative to the processed icky stuff. (Check out my Breakfast Quinoa here for another amazing breakfast idea during Passover or any time of year.)
Eat this granola as a wonderful snack any time. I’m eating some right now.
This recipe comes to us via Judy Zeidler, a very popular cookbook author/restaurant owner in kosher Los Angeles. I attended a Passover cooking class with her in the basement of the Skirball Museum years ago. The pages of recipes I brought home with me then are now filled with food stains. Always a good sign. I haven’t come across this particular recipe in any of her books and was thrilled to learn of it in her class. She uses whole raw almonds, cut in half around the middle. That’s a great way to go, but this granola recipe is delicious with a mix of nuts as well.
She also uses more honey than I do. I find 1/4 cup is plenty. And I increase the amount of nuts and farfel. Adding a bit of cinnamon and sea salt is terrific.
Begin by toasting some matzah farfel.

Cut up some almonds while that’s happening. Or get out nuts that are already chopped.

Mix the nuts with oil, honey and cinnamon and salt. Unsweetened coconut is a big plus.

Place on a greased, foil-lined baking pan.

While granola bakes, dice up a few apricots and grab a handful of golden raisins.

So nice and toasty.

Throw the dried fruit on top of the warm granola.
 Peel it off the aluminum foil and store in containers or Ziploc bags. It stays well in your pantry, fridge or freezer.
SO so good with yogurt and fruit…

PASSOVER GRANOLA
thank you, Judy Zeidler
Ingredients:
2 1/2 c. matzah farfel
1/2 c. whole raw almonds, cut in half (or slivered almonds)
1/2 c. walnut pieces
1/2 c. unsweetened coconut flakes
1/4 c. canola oil
1/4 c. honey
1/2 t. cinnamon
pinch of sea salt
1/2 c. dried apricots, diced
1/2 c. golden raisins
Directions:
Preheat oven to 350°.
Toast matzah farfel on unlined baking sheet for 7 minutes.
Place farfel in large bowl with nuts and coconut and toss. Add oil, honey, cinnamon and salt. Mix well.
Spread mixture on foil-lined, slightly oiled baking sheet.
Bake for 18-20 minutes, stirring halfway through. Remove from oven when golden brown and fragrant. Add dried fruit and toss well. When cool, place in glass jars, plastic containers or Ziploc bags.
Makes about 5 cups. Start your snacking engines!
 Gifts of Granola

PS Don’t tell the niece, but a gift of granola is on its way to her. She just ushered in a second little guy into the world. Just in time for Passover.
 Ilan Max
How is this vegetable soup different from all other vegetable soups? (’tis the season; I’ve got questions on my mind – so if you will be celebrating the story of Passover, please sing this question to the tune of Mah Nishtanah)
It’s Tuscan! That means inspired by the fertile Tuscany Valley. Countless combinations with a few basics. Fresh vegetables in vibrant contrasting colors. green things like spinach or chard or kale. Orange like butternut squash. Olive oil for richness. Tomato for depth of flavor. Beans, for thickness and more flavor like cannellini, Northern beans, red beans or garbanzos. And fresh herbs or dried, like oregano, thyme and/or parsley.
If you can believe this, Novio was not a soup person in his single days. He didn’t get it. Liquid food? He wanted the solid stuff. Something he could sink his teeth into. All that changed when he came down with a nasty cold one year. My Novio, thank goodness, is a sturdy guy. This was not a usual event, Grudgingly, he made his way to a favorite restaurant and ordered himself a piping hot bowl of the daily special. He thinks it might have been mushroom barley, but he’s not sure. Doesn’t matter. He’s now a true believer in soup. Of any denomination.
Good. Because I love soup. And I don’t think I’ve ever made a soup the same way twice. I even tinker with the most traditional one of all… chicken soup.
So I began this Tuscan veggie soup in a very traditional way – by sauteing chopped onions and garlic in olive oil. I also chopped up some carrots and celery. And threw in a parsnip too.

The liquid for the soup is a combination of vegetable broth, chopped tomatoes in their own juice and water.

Butternut squash, rinsed canned beans and spinach are going in later.
 Before the broth…
 After the broth…
And here come the other ingredients…

TUSCAN VEGETABLE SOUP WITH SPINACH & BUTTERNUT SQUASH
Ingredients:
2 T. olive oil
1 large onion, chopped
2 cloves garlic, chopped
2 large carrots, peeled and diced
2 stalks celery, diced (use the leaves too)
1 parsnip, peeled and diced
1 small butternut squash (or half a medium), diced
1 t. dried oregano
4 c. low-sodium vegetable broth (or regular)
1 14-oz. can fresh diced tomatoes in their juice
2 c. water
1 14-oz. can Great Northern beans (or another white bean or garbanzos), drained and rinsed
2 c. fresh spinach
1/2 c. fresh Italian parsley, roughly chopped
salt & pepper to taste
Directions:
Heat olive oil in heavy-bottomed pot. A Dutch oven or your favorite soup pot are excellent choices. Add chopped onion and cook for 5 minutes. Add garlic, celery, carrot, squash and dried herbs and cook for 5 more minutes.
Add the liquids: broth, tomatoes and water. Bring to a boil, then lower heat to a gentle simmer and cook for 45 minutes with lid askew (like a jaunty beret). And beans and cook for 30 more minutes. I like everything soft.
Add spinach and cook until just wilted.
Add salt and pepper to taste. Add chopped parsley to finish.
Makes 6-8 servings. Like all soup, this one gets better the more you re-heat it.
bb serving ideas: Top off each bowl with a drizzle of olive oil. If going dairy, sprinkle a little grated parmesan on top of each bowl.
Watch the satisfied faces of your favorite soup-eaters… here’s a personal favorite…


Novio has a friend who’s a drummer and they get together as often as they can with other musician buddies to play their favorite tunes (Classic Rock, British Invasion, you Boomers know what I’m talking about). Mike’s a Jewish guy who was raised in the American South. And his mom cooked in the good ol’ Southern tradition.
When Mike’s mom passed away, she had left for him the small tin filled with her cherished recipes, handwritten on index cards. Every New Year’s Day, he honors his mom by cooking for hours and preparing a big ol’ Southern dinner. And he invites all his friends over to partake of this terrific meal.
So every New Year’s Day, his lucky friends are treated to fried chicken, greens, black-eyed peas, and either mac & cheese or cheesy grits, depending on his mood. Of course, there’s also plenty of cornbread to go around.
And Mike has his friends bring their favorite beverages or desserts.
This year, I thought I’d stay with the theme and look for a southern dessert to bring along. I found it in Mississippi Mud Bars. I did some research and ended up using the recipe on the inside of the wrapper of the Ghirardelli White Chocolate baking bar (it’s on the inside of their Semi-Sweet bar too). I left the recipe as is. But I did lower the sugar from 3/4 cup firmly packed brown sugar to a 1/2 cup of loosely packed brown sugar. You know me.
Mississippi Mud bars are right up my alley – a combination/variation of two of my favorite bar cookies, Brownies and Blondies.
Ingredients are simple simple simple.

 Ahhhh….. chocolate

I love buying big one-pound hunks of Belgian chocolate. BUT, when time is of the essence and I can’t get to the specialty shop in Culver City that sells it, I head for the market and get a great quality chocolate in a 4-ounce bar. Also, because it’s thin, it’s MUCH easier to chop.
 Terrific chopped chocolate in no time. And so simple, Novio did it like a pro. He was compensated well for his efforts. And again and again, as I’ve made this several times since.


 Here comes the spreading of the chocolate


MISSISSIPPI MUD BARS
Thank you, Ghirardelli
Ingredients:
1/2 c. unsalted butter, softened
1 egg
1 t. pure vanilla
4 oz. semisweet chocolate, chopped and divided
4 oz. white chocolate, chopped and divided
1 c. chopped walnuts or pecans, divided
Remove from oven. Sprinkle remaining chopped semisweet and white chocolate over top. Cover with foil and let stand for 5 minutes until chocolate melts. Swirl chocolate over the top with small knife. Sprinkle on remaining nuts.
Cool in pan on wire rack until chocolate is set. Cut into 16-20 bars. If you want to do mini-bars, do a 5×5 grid and you’ll have 25 little bars to distribute to those you love.

PS My Novio is a man of many talents. He’s a great singer and keyboard player, so I get to be his groupie a lot. And his buddies reap the benefits of bb’s kitchen activities when they’re around.
Good, now that I’ve got your attention… I have been making variations of these bars ever since I spotted the recipe in Chewy Gooey Crispy Crunchy Melt-In-Your-Mouth Cookies , the amazing cookbook by Alice Medrich. Thank you for turning me onto this, my good friend and Israeli blogger, Hanni (Check out Spots on Pots here).
I was first acquainted with a derivative of one of the main ingredients of this bar several decades ago when rushing into the girls’ bathroom at Bronx Science, my alma mater. A thick cloud greeted me. “What is that SMELL?!?” I shrieked. The cool girls congregating therein looked down their noses at me, as CHIEF COOL GIRL held a hand-rolled cigarette between her thumb and forefinger.

Oh, it’s the 21st century and the canabis seed is so popular now that it’s been identified as being chock-full of Omega-3 fatty acids. Those are a type of fatty acid that the body must ingest for good health because said body does not synthesize it. Did I mention the hemp plant has been used for all manner of things for more than 12,000 years? Yes, it’s true. Check it out here. People have been doing very creative things with natural resources for a ridiculously long period of time. Now if we can only learn how to behave so we don’t use up all those resources, we’ll be in good shape.

Anyway, I’ve been trying dufferent takes on these bars, using chia seeds, quinoa, raw millet, more pumpkin seeds, keeping with the overall amount of dry ingredients called for.

When it came to the honey, I automatically reduced the amount of honey called for. Well, it doesn’t take a rocket scientist to predict that not sticking to the amount of sticky substance called for meant that the little bars didn’t stick together that well.

This was not a big deal for me or for Novio because we enjoy the little bars and I keep whatever falls off in little clumps/crumbs as an absolute delicious topping for plain yogurt. A little sweet. A little crunchy. Fantastic!

Maybe swapping brown rice syrup for part of the honey is one solution. I would have tried that for you, dear readers, but I didn’t have any brown rice syrup in the house and it is against bb’s policy or mine to go out to buy just one item. So, I decided to do something really unusual for me and follow the recipe as is. And guess what? I was able to cut it into squares without a third of it staying behind for yogurt!

HONEY HEMP BARS
from Alice Medrich’s Chewy Gooey Crispy Crunchy Melt-In-Your-Mouth Cookies
INGREDIENTS:
1 2/3 c. puffed rice or millet cereal (I used Barbra’s Brown Rice Crisps)
1/2 c. hemp seeds
1/2 c. pecan or walnut halves, chopped (either is great)
2 T. white (or black) sesame seeds
1/3 c. raw pumpkin seeds
2 t. flax seed meal
2 T. dried currants
scant 1/2 c. honey
1 T. date paste or mashed dates
1/8 t. salt
1 t. pure vanilla extract ( I upped this from 1/2 T.- I love vanilla)
DIRECTIONS:
Line an 8″ metal baking pan with parchment paper or aluminum foil.
Preheat oven to 300° F. Position a rack in the lower third of the oven.
In a large bowl, toss the cereal, hemp seeds, sesame seeds, pumpkin seeds, flax seed meal, and currants.
Heat the honey, date paste and salt in a one-cup glass measuring cup for 30 seconds in the microwave (or in a small saucepan on the stove). Stir and mix well until date paste is dissolved. Add vanilla. Pour honey mixture over the dry ingredients and mix with a wooden spoon until all ingredients are moistened and sticky.
Scrape mixture into the lined pan and spread evenly with a fork. Using the back of the fork or your fingers, press mixture very firmly and evenly all over pan.
Bake for 30 to 35 minutes, until the top is barely golden. Cool in pan on a rack.
Lift the ends of the parchment to remove bars from the pan. Use a sharp knife to cut bars or squares. May be kept in an airtight container for two weeks.
Makes 16-25 bars

As you can see, these little bars made their way to the January meeting of Food Bloggers Los Angeles. I sent Novio along with these bars. He was kind enough to be my emissary as I seem to be over-scheduling myself lately and I don’t do cloning. He had a wonderful time. He likes to shmooze with people who cook well, like to photograph food, discuss food and eat.


By the way, that’s Dorothy Reinhold, of Shockingly Delicious, in the center photo, discussing her updated chocolate pudding. Novio tells me it was delicious (in fact, shockingly delicious) Check out Dorothy’s blog by clicking here.
I promised you a Kabocha Squash recipe a while back. Actually, quite a while back. I decided to keep it out of my outrageous Autumn Stew (click here to view that post). No reason, totally on a whim – it would work there too. Since then, I’ve been busy with a bit of traveling and a whole lot of baking. And we’ve been eating lots of simple and healthy meals to offset all the holiday sampling/enjoying/losing all sense of moderation. You know what I mean. Don’t need to say any more. Enough said.
Simple, healthy, full of flavor dishes are terrific. And I’ve been trying all kinds of variations of this dish. This time of year, the markets are filled with so many types of squash. You can prepare Acorn Squash the same way. They’re usually a bit smaller and may be ready in a bit less time.

The farmers’ market guy gave me a good tip, which I duly pass along to you, my readers.
He advised that I cut the squash in half around the equator, not the long way. He thinks it’s easier to cut that way. I’m not completely sure, what do you think?

The squash is ready when it’s fork-tender. The texture is meaty and the flavor is wonderful, slightly sweet and nutty. And the peel is tender and perfectly edible.

Do you have cooked quinoa in the house? Yes? Excellent! No? Make some or sub couscous, brown rice, farro, to name a few choices.. or simply serve with goat cheese.
 Fresh herbs are nearby? Great! Give a rough chop and done!
In a pinch, use a pinch… or several… of favorite dried herbs.

I add green onions to most things. No exception here.
Uh uh and that’s the way uh huh uh uh I like it uh huh uh huh…
Thank you, KC & The Sunshine Band
 Let’s pretend this Kabocha is a Crystal Squash…
Ah ha!
There is Meaning, Joy and that Sense of Wonder
that makes life so precious in the year ahead…
And just in case, Let’s Make It So!
BAKED KABOCHA SQUASH WITH QUINOA & HERBED GOAT CHEESE
INGREDIENTS:
1 medium/small Kabocha squash
2 T. water
1/4 c. cooked quinoa
1 green onion, thinly sliced
1 T. fresh Italian parsley, chopped
1 T. fresh dill, chopped (optional)
2 T. goat cheese, crumbled
2 t. olive oil
salt & pepper
DIRECTIONS:
Preheat oven to 375°.
Cut squash along its equator. Scoop out seeds.
Line a medium-sized roasting pan with foil. Place squash in it cut-side down. Add water to pan.
Bake 30 minutes or until fork easily pierces the flesh.
Meanwhile, slice green onion and chop herbs. Mix with goat cheese. Or simply pile herbs on top of cheese when assembling.
Place squash halves, cut side up, on 2 medium plates. Divide quinoa between the two cavities. Add herbed goat cheese. Drizzle each half with a teaspoon of olive oil. Add salt & pepper to taste.
Serves 2.
Delicious as a hearty side or as a light meal with a salad.

Happy 2016, My Dear Readers!
I love sharing with you and am grateful for your support these past four years!!!!
Eat in Joy!